System
System Configuration
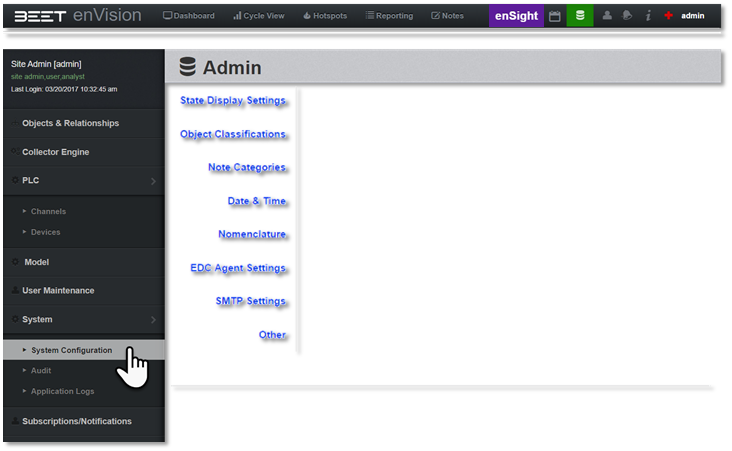
The System section tab has many different sections that have the setting and configurations for the Admin Module. Clicking on the System Configuration tab will reveal the subsection to the right.
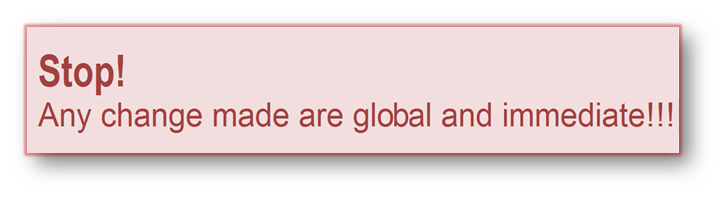
Warnings
If this message appears anywhere on a window you are viewing, take caution. Any changes made will change all global settings immediately on the network. Be very cautious when performing any actions or changes on any window with this warning.
State Display Settings
The State Display Names Tab is used to edit the default names, colors, and appearance of the objects and display names. NOTE: These changes made are global and immediate!!!
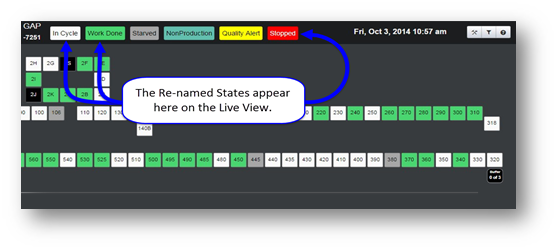
The names of the States all have a default name. If you wanted to use another name other than the default, simply use the edit box under the Override column, to the right of the State (default) name, to change it to what you desire.
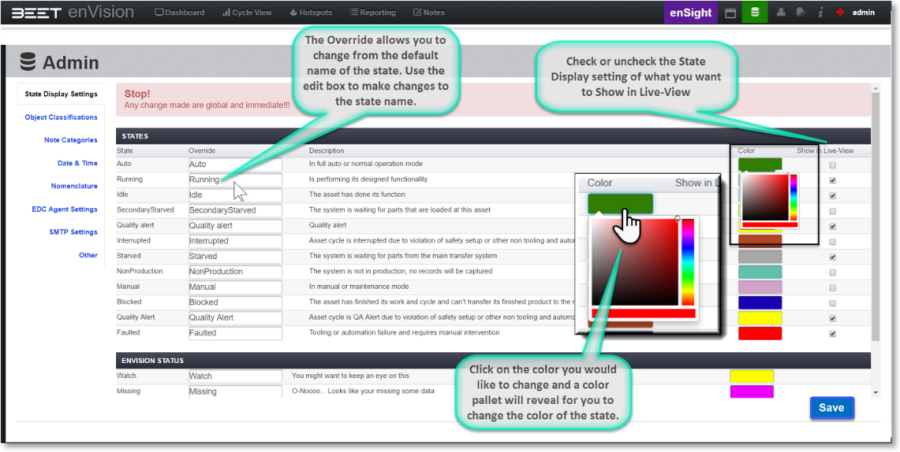
The states have a default color code for each state, but they can be modified as well. Simply click on the colored box and a color pallet will appear. Choose the color, tone, and hue you desire.
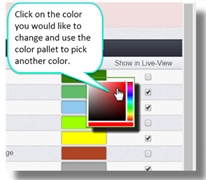
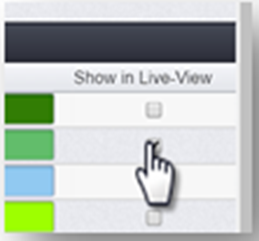
At the far-right side is a column labeled "Show in Live View". Check and uncheck the boxes to show this state in the Live View Module. When everything is set, click the Save button.
Object Classifications
The Object Classification tab controls the Classifications on the Edit Select object window, under the Objects and Relationships window. Any changes that you make here in this window will display when viewing Group level objects in the Objects and Relationship window.
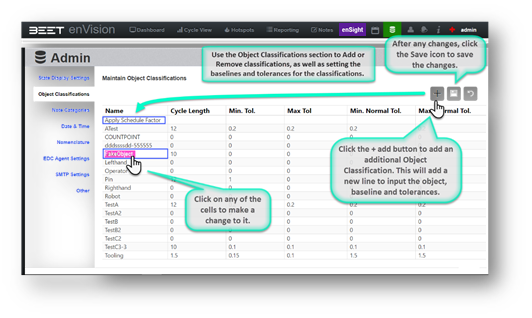
These Classifications created here, are used for Grouping, Sorting, and other purposes used in the reports.
Simply double-click an Object Classification and then edit it to read what you desire.
If a field has a Lock icon, then this Object Classification cannot be changed in this window.
There is an open field to enter a new Object Classification if needed. Simply click on it and enter the Classification.
When you are finished, these Classifications will appear on the Objects and Relationships window, when you have a Group level object selected. The Edit Selected Object tab is selected, as seen here. 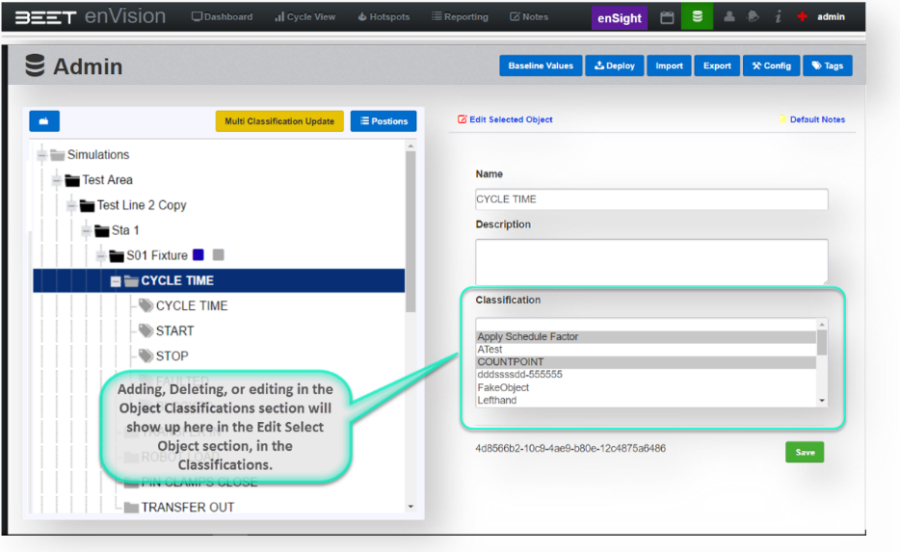
Note Categories
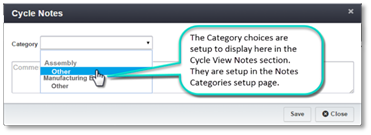
The Notes Categories tab holds the key to configuring the Notes Category list in the Cycle View Browser. From here, you can add, remove, or edit the categories that will appear in the Cycle View Notes. To add a new Category or Subcategory, click on the editing box with the labels starting with "Add New". Input your new Category or Subcategory. For an already existing Category or Subcategory, you can double click on it to edit the field.

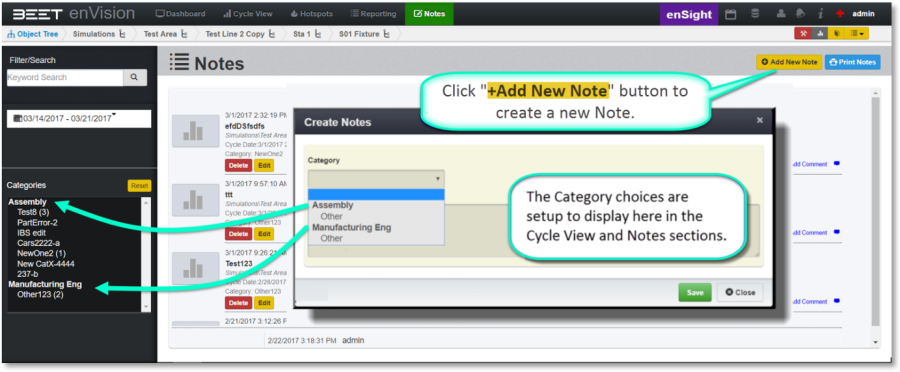
In the Cycle View browser, when viewing an Asset or Group level object you can click on the Notes. button to create a note. Shown here is a screenshot from the Notes browser section. When the Category pulldown is selected, it shows the selections you made in the Note Category List editor.
Date and Time
This section controls the Date and Time formats that appear in the Envision, Tables, and Data.
Date Format
To change the date format, click in the Date Format editing box and delete the previous format if there was one present before. Input a different format style in its place. If it is recognized by the program, then it will show an Example below the Edit box.
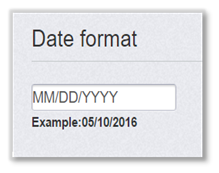
Date formats examples:
American MM/DD/YYYY
European-DD.MM.YYYY
Japanese-YYYY-MM-DD
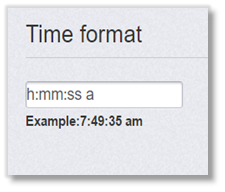
Time Format
To change the time format is very similar to changing the date format. Click in the Time Format editing box and delete the previous format, if there was one present before. Input a different format style in its place. If it is recognized by the program, then it will show an Example below the Edit box.
Common Time Formats:
h:mm:ss a / 1:30:00 p.m.
hh:mm / 13:30
h:mm / 1:30
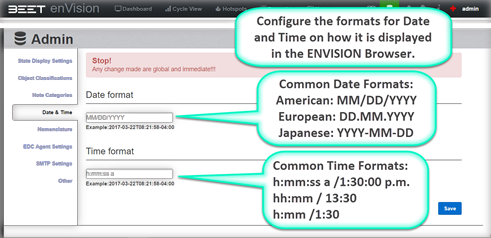
When your changes are complete, click the Save button and the changes will update in the program.
NOTE: These changes made are global and immediate!!!
Nomenclature
Because of different industry standards, some companies have different definitions and keywords for certain parts of their company. Based upon company needs, it may be necessary to rename one or more of the Default Objects, Part-type, Parts, and Pallets. The Default Object names are common and/or typical names in manufacturing.
NOTE: These changes made are global and immediate!!!
In this case, we would like to change the name for the Line (default) object from Line to Segment. Click on the Editing box for Line. Delete the previous name (Line). Then input the name (Segment) you desire.
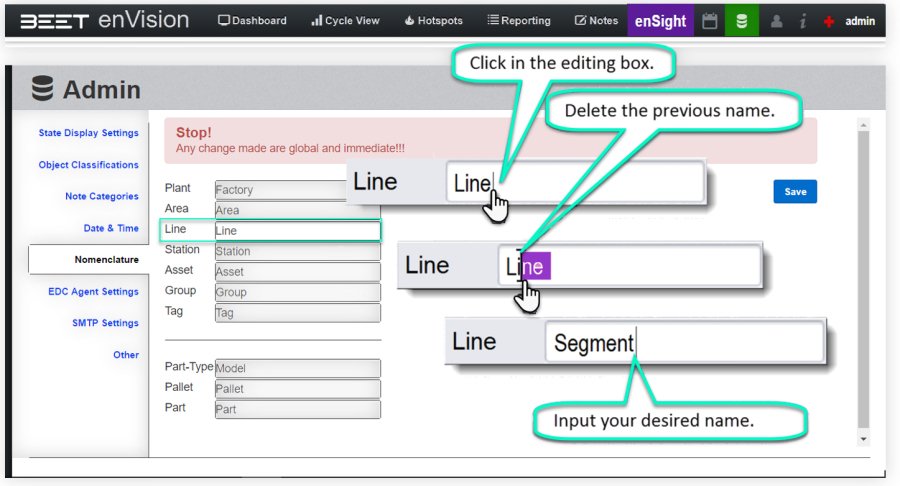
After your changes, review your changes and click Save to complete the process.
EDC Agent Settings
The EDC Agent Configuration screen is used to set the Heartbeat Update Delay. Since the Agent is continually trying to contact the EAS, constant contact would cause a strain on the EAS. Therefore, this configuration setup feature will allow the EDC Agent to connect to the EAS and update at a specified interval (120 seconds in this example). The inputted number must be greater than 59 seconds.
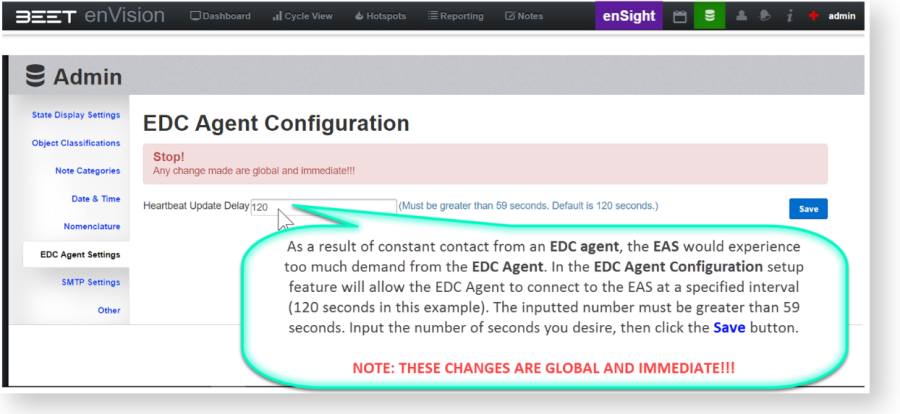
Input the number of seconds you desire, then click the Save button. NOTE: These changes made are global and immediate!!!
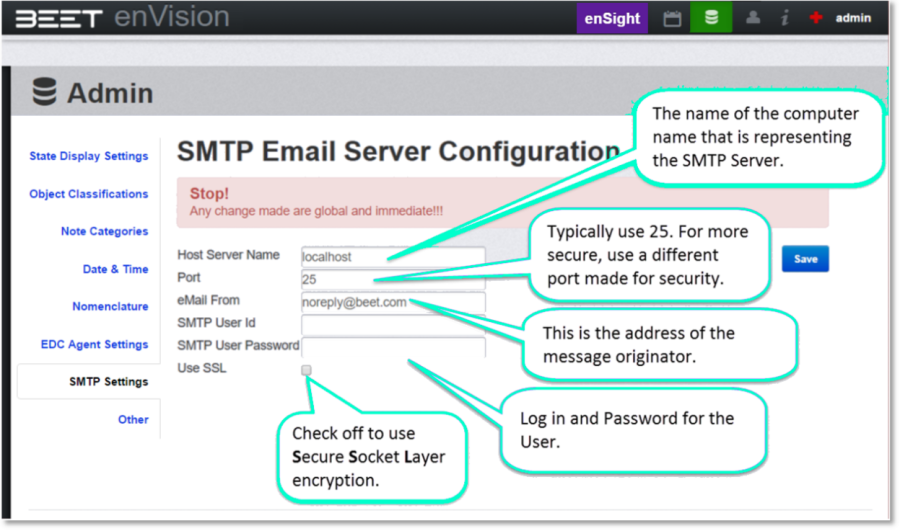
SMTP Settings
Simple Mail Transfer Protocol (SMTP) is an Internet standard for electronic mail (email) transmission. SMTP by default uses TCP port 25. For a more secure port, it will allow you to change to a more secure port (e.g. 465 or equivalent).
This page allows you to input the Host Server Name (the computer representing the SMTP server), your choice of the port to use, the email of the originating message, login information, and the option to use SSL (Secure Socket Layer) encryption.
NOTE: These changes made are global and immediate!!!
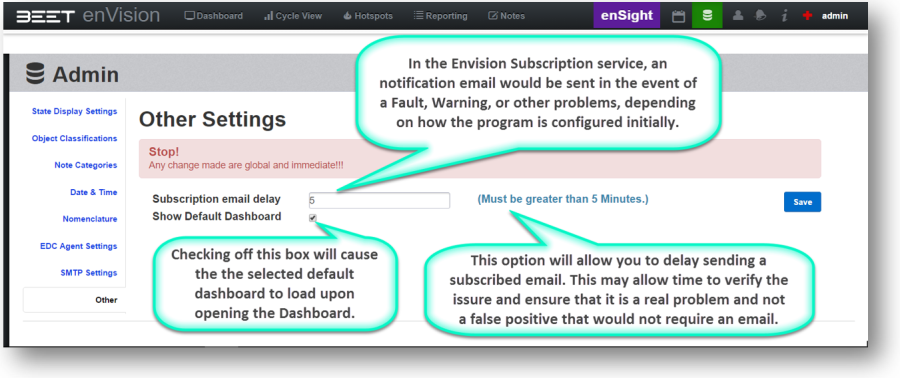
Others – Subscriptions and Default Dashboard
In the ENVISION system, an email is automatically sent in the instances of certain events such as a fault, stoppage, or whatever is set in the configuration. For this reason, there is a configurable option to delay the automatic email. The Email Delay setting box is set to delay the email is automatically sent (in Minutes). This must be set for greater than 5 minutes. This would give you a preset time period that would allow you to verify an issue and make sure it is not a false positive or a false alarm before an email is sent. The level is set based upon the time needed to verify the issue.
NOTE: These changes made are global and immediate!!!
AUDIT
The Audit Log contains all the changes made from the actual user that is logged in. This log will show the date of the action performed, User, Method, Entity ID, Field, Comments, and the actual Data changed.
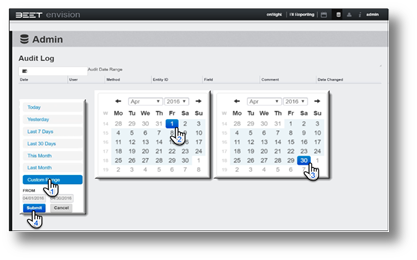
To use this feature, simply click on the Audit Date Range Icon to open a date range selection window. Choose from Today all the way to a custom range. In custom range, you select the start date and the end date, then click on Submit.
Audit Date
When an action is performed in the Admin Module, that requires a Save or a change on a screen that makes instant changes, Envision records the event Date and actual time the action was taken.
User
The user who logs into the Envision program will have their User ID added to the record. For example, Thomas Katt (username TomKat) will show up as TomKat under user.
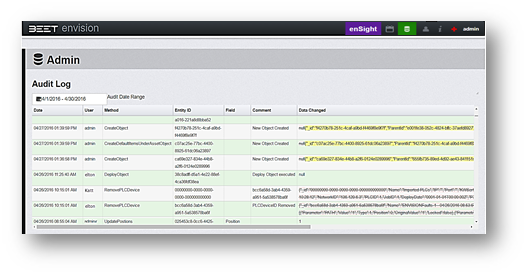
Method
The Method is the way that the action was performed. By use of an action button (Save), command, process, update, or removal.
Entity ID
The entity ID is a label assigned to the action that was performed?
Comments
Comments are inputted by the User when the action was taken.
Data Changed
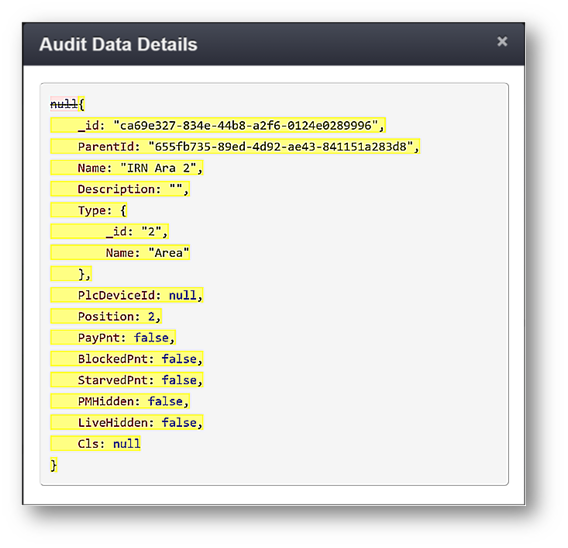
The data changed section shows what the original data (Original Data in Pink with STRIKETHROUGH) was before it was changed, then shows the new data (New Data Highlighted in Yellow)as well using a color code and format to show the changes. If the result of the changes was wrong, it preserves that original data to revert to if needed. Click on any of the highlighted data in the Data Changed column and a window of the original and modified data will appear, as seen below.
In this example, you can click any of the highlighted area in the Data Changed column to open an Audit Data Details window - null {"_id":"bdb595cb-0689-491c-a016-221a8d8bba52","PerentId":"f4270b7
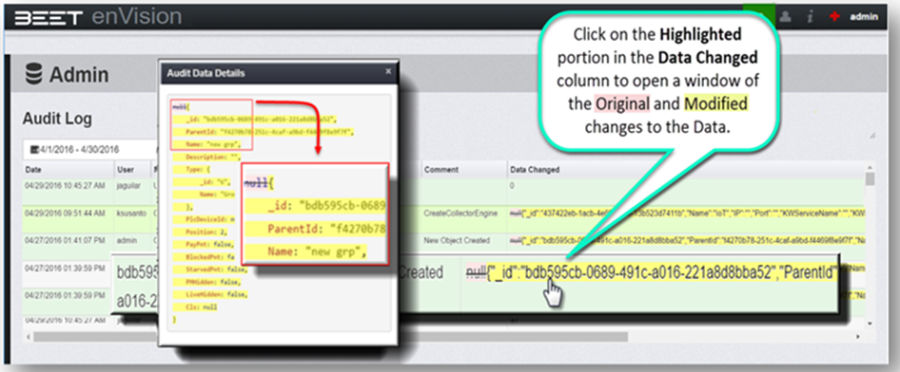
The Audit Data Details window contains all the data from the previous setting. When new data is entered, it highlights the previous data in pink with a strikethrough highlights and also shows the new data in yellow highlight. If a situation occurs where you need to revert to the original configuration, this data would be available.